Table of Contents
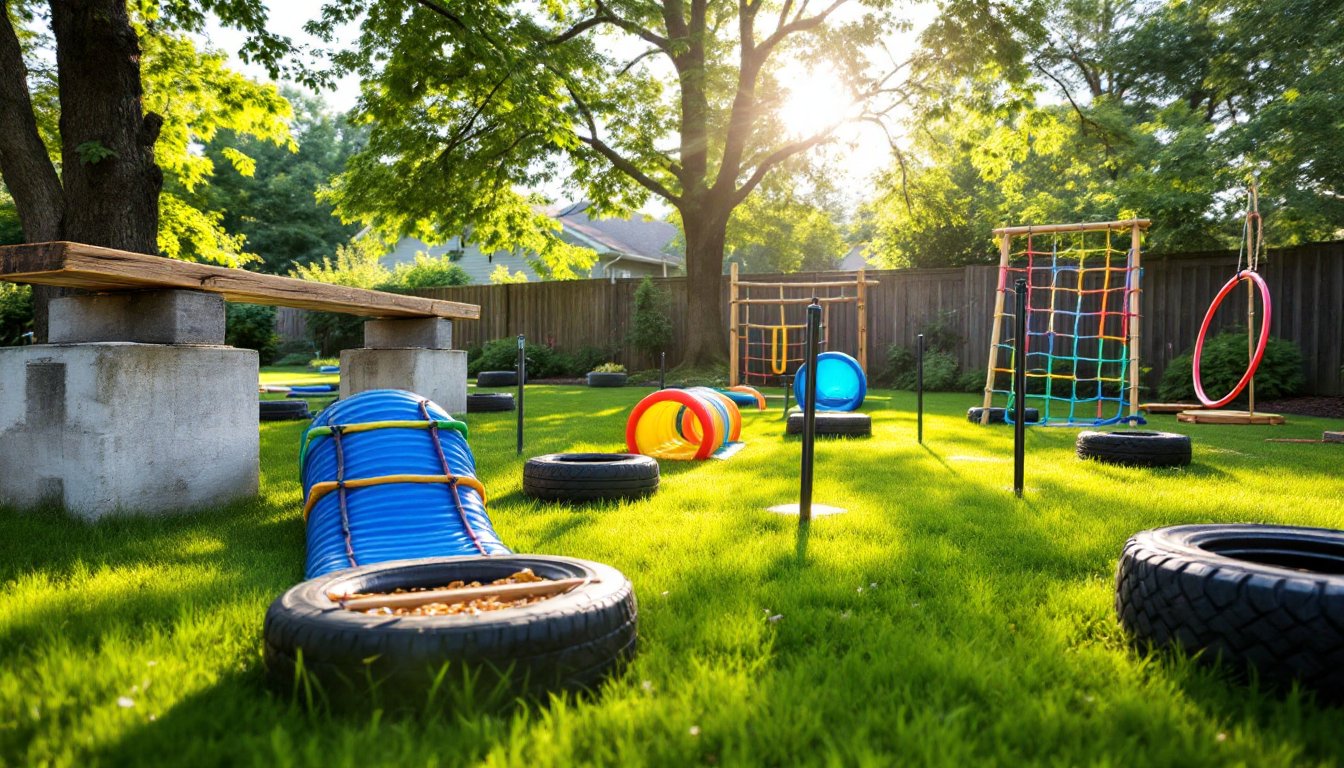
ToggleBuilding a <a href="https://langlandsurf.com/diy-backyard-playground-2/”>backyard obstacle course isn’t just about keeping kids busy on summer afternoons, it’s about creating a custom fitness space, family challenge zone, and outdoor play area that grows with the household. Whether the goal is to burn energy before bedtime or train for a Spartan race, a DIY course offers flexibility that commercial playgrounds can’t match. Plus, most obstacles can be built with basic tools and salvaged materials, making this one of the most cost-effective backyard upgrades a homeowner can tackle. With proper planning and attention to safety, anyone can transform unused yard space into an adventure zone that sees daily use.
Key Takeaways
- A backyard obstacle course delivers functional fitness benefits like improved strength, balance, and coordination while keeping kids active off screens without expensive gym memberships.
- Building DIY backyard obstacle course ideas is cost-effective using salvaged materials like pallets, tires, and free wood chips from tree services instead of purchasing new supplies.
- Start with simple ground-level obstacles such as tire runs, pool noodle hurdles, and balance beams before progressing to advanced structures like rope climbs and climbing walls.
- Proper planning including yard measurement, spacing obstacles 6-10 feet apart, and creating a scaled layout on graph paper prevents costly construction mistakes.
- Maintain safety through monthly inspections of wooden structures, clear 6-foot fall zones filled with 9-12 inches of impact-absorbing material, and age-appropriate obstacle design.
- Well-designed backyard obstacle course structures can enhance property value and remain flexible since portable obstacles can be easily modified or removed for future homeowners.
Why Build a Backyard Obstacle Course?
A backyard obstacle course delivers benefits that extend beyond simple entertainment. For families, it gets kids off screens and into physical activity without the need for organized sports or expensive gym memberships. Parents who work from home appreciate having an energy outlet that doesn’t require supervision once safety rules are established.
From a fitness standpoint, obstacle courses offer functional training that improves strength, balance, coordination, and cardiovascular endurance. Unlike repetitive gym equipment, courses provide varied challenges that engage different muscle groups and movement patterns. Teens and adults training for obstacle racing events like Tough Mudder or Spartan Race can practice specific skills, wall climbs, rope traverses, balance beams, in their own yard.
Property value considerations also come into play. A well-designed course that looks intentional rather than haphazard can be a selling point for buyers with active families. The key is building structures that can be easily modified or removed if future owners don’t share the same interests. Permanent installations like concrete footings for climbing walls should be considered carefully, while portable obstacles offer maximum flexibility.
Planning Your DIY Obstacle Course Layout
Before breaking out the circular saw, assess the available space and identify any limitations. Measure the yard dimensions and note obstacles like trees, utility lines, irrigation heads, and property line setbacks. Most municipal codes don’t regulate non-permanent play structures under a certain height (typically 8 feet), but always verify local regulations before building anything that requires concrete footings or ground anchors.
Slope and drainage matter more than most homeowners expect. Running uphill obstacles add difficulty but can also create erosion issues after rain. Plan for wood chips, rubber mulch, or other impact-absorbing ground cover under high-traffic areas and anywhere participants might fall from height. The Consumer Product Safety Commission recommends 9-12 inches of loose-fill material under structures with fall heights between 5-7 feet.
Create a course flow that makes sense for the intended users. Linear courses work well in narrow side yards, while properties with more space can accommodate loops or circuits. Consider traffic patterns, will multiple people use the course simultaneously, or is it designed for timed individual runs? Space obstacles 6-10 feet apart to prevent collisions and allow for safe dismounts.
Draw a scaled layout on graph paper or use free design software to visualize the arrangement. This planning phase helps identify material quantities and prevents the common mistake of building obstacles that don’t fit the available space. Mock up key obstacles with cardboard boxes or stakes and string to test spacing before committing to construction.
Easy DIY Obstacle Course Ideas for Kids
Tire run: Source used tires from auto shops (they often give them away) and half-bury them in a staggered pattern. Kids step through the centers in a zigzag pattern, improving foot placement and agility. Scrub tires thoroughly with degreaser and let them air out for several days to reduce rubber smell.
Pool noodle hurdles: Drive 1/2-inch PVC pipe or 3/4-inch rebar into the ground and slide pool noodles over the uprights to create adjustable-height hurdles. This setup allows height modifications as kids grow and eliminates the injury risk of rigid crossbars. Many beginner-friendly building guides feature PVC-based obstacle designs that work well for younger children.
Crawl tunnel: Connect multiple 2-foot diameter corrugated drainage pipes (available at home centers in 10-foot sections) to create a crawl-through tunnel. Stake down with landscape fabric pins to prevent rolling. For added challenge, create an S-curve rather than a straight line.
Balance beam: A single 2×6 treated lumber laid flat on the ground provides a starter balance obstacle. Nominal 2×6 lumber measures 1.5 inches × 5.5 inches actual, giving kids a forgiving width to practice on. As confidence builds, raise the beam 6-12 inches on concrete blocks or lumber scraps. Always use treated lumber rated for ground contact (rated .40 or higher for ground contact applications).
Hula hoop jump: Secure hula hoops to the ground with landscape staples or rest them in shallow trenches. Kids jump from hoop to hoop, working on explosive leg power and landing control. Vary the spacing to adjust difficulty.
Challenging Obstacles for Teens and Adults
Rope climb or traverse: A quality climbing rope (1.5-inch diameter minimum for grip comfort) can be rigged vertically from a sturdy tree branch or horizontally between two anchor points. For horizontal traverses, the rope should be 6-8 feet off the ground with adequate fall zone underneath. Inspect anchor points carefully, a healthy branch should be 6 inches minimum diameter where weight is applied. When building structures for older participants, these woodworking project tutorials offer useful guidance on proper framing.
Cargo net climb: Mount a cargo net (available from commercial playground suppliers or military surplus vendors) to a sturdy frame built from 4×4 posts set in concrete. Posts should extend 3 feet minimum into the ground with concrete footings below the frost line. Net dimensions of 8×10 feet provide adequate climbing surface without requiring excessive lumber. This is structural work, if uncertain about load calculations, consult a structural engineer.
Monkey bars: Build a basic overhead ladder from 2×6 treated lumber with 1.5-inch wooden dowels or steel pipe as rungs. Space rungs 12-15 inches apart for standard grip transitions. The structure should be 7-8 feet tall to allow adequate ground clearance for hanging adults while keeping the overall height within non-permit territory in most jurisdictions. Lag bolt all connections with 1/2-inch × 6-inch lags into pre-drilled pilot holes.
Wall climb: A 8-foot tall × 4-foot wide plywood wall angled at 45 degrees creates a scalable obstacle. Use 3/4-inch exterior-grade plywood backed by a frame of 2×4 studs spaced 16 inches on center. Attach climbing holds (purchase from climbing suppliers) with T-nuts and bolts, allowing hold positions to be rearranged as skills progress. Anchor the base securely with ground anchors or concrete footings.
Tire flip station: A large tractor tire (300-400 pounds) provides a functional strength obstacle. These tires are often free from agricultural suppliers or tire dealers. Flipping technique matters, legs should drive the movement, not the lower back. This obstacle requires adequate surrounding space since the tire travels several feet with each flip.
Budget-Friendly Materials and Repurposed Items
The most economical obstacle courses leverage salvaged materials and creative repurposing. Check community boards, construction sites (with permission), and demolition projects for free or cheap lumber. Pallets break down into useful board stock, though they should be inspected carefully for structural integrity and contamination, avoid any marked “MB” (methyl bromide treatment).
Landscaping timbers (4×4 or 6×6 treated) often go on clearance at home centers when they’re weathered. These work perfectly for balance beams, step-ups, and frame components. A 12-foot timber that costs $15-20 new might be $5-8 on clearance. For inspiration on maximizing outdoor spaces on limited funds, explore these DIY backyard ideas.
Cinder blocks serve multiple purposes, balance stepping stones, hurdle bases, or weighted anchors for rope obstacles. At roughly $1.50 each, they’re one of the most versatile budget materials. Stack and fill with concrete for permanent anchors, or leave them loose for movable obstacles.
Rope alternatives: Marine-grade rope runs $50-80 for a 25-foot climbing rope. Budget alternative: retired climbing rope from rock gyms (always inspect carefully for wear) or 1-inch Manila rope from farm supply stores at $25-30 per 50 feet. Manila deteriorates faster outdoors but works for seasonal use.
Old playground equipment from schools or parks often becomes available when facilities upgrade. Metal slides, climbing components, and swing hangers can be incorporated into custom obstacle designs. Check municipal surplus auctions and online marketplaces.
Ground cover: Instead of expensive rubber mulch ($6-8 per cubic foot), source wood chips free from tree service companies. A single truckload provides enough coverage for most residential courses. Wood chips decompose over time, so plan to refresh every 2-3 years. Alternatively, salvaged gym mats from fitness centers closing or upgrading provide excellent fall protection when layered 2-3 inches thick.
Safety Tips for Your Backyard Obstacle Course
Inspect regularly: Wooden structures expose to weather develop weak points. Check for rot, loose fasteners, and splintering monthly during active use periods. Pressure-treated lumber resists rot better than untreated wood, but no outdoor structure is maintenance-free. Tighten all bolts and replace any cracked or deteriorated components immediately.
Fall zones: Maintain clear landing areas extending 6 feet in all directions from obstacles where participants might fall or dismount. This is especially critical around elevated elements like monkey bars, climbing walls, and balance beams. Remove rocks, roots, and hard objects from these zones.
Age-appropriate design: Obstacles should match user capabilities. A cargo net safe for a 14-year-old athlete might be dangerous for a 6-year-old. Consider building separate zones or adjustable elements that accommodate different skill levels. Supervision requirements vary, young children need constant monitoring, while teens can typically use courses independently after learning safety rules.
Proper PPE: Close-toed shoes with good tread are non-negotiable. Bare feet increase splinter risk and reduce grip on wooden surfaces. For rope obstacles, consider weightlifting gloves or gardening gloves to prevent blisters and rope burn. When building obstacles, always wear safety glasses, work gloves, and hearing protection when cutting lumber or using power tools.
Structural integrity: Any obstacle where failure could result in a fall from height requires robust construction. Use properly-sized fasteners, 3-inch deck screws minimum for 2× lumber connections, lag bolts for heavy-load applications. Don’t rely on nails for structural connections: they pull out under dynamic loads. When in doubt about whether a structure needs engineered footings or professional installation, err on the side of caution.
Weather limitations: Wooden obstacles become slippery when wet. Establish a “no use during/after rain” rule until surfaces dry. Rope obstacles stretch and weaken when wet, reducing their safe working load. Metal components like monkey bar rungs can become hot enough to burn hands in direct summer sun, consider shade structures or time-of-day restrictions.
For those considering broader updates to play spaces, check out detailed guidance on creating backyard playground setups. Additional step-by-step DIY project tutorials provide useful safety protocols for various building applications.
Conclusion
A well-executed backyard obstacle course delivers years of use without requiring the footprint or budget of traditional play structures. Start with simple, ground-level obstacles to test the concept and user interest, then expand based on what gets used most. The modular nature of most obstacles means the course can evolve, what works for elementary-age kids can be modified or replaced as the family’s needs change. With attention to safety fundamentals and honest assessment of skill level versus obstacle difficulty, homeowners can build training and play spaces that rival commercial facilities at a fraction of the cost.