Table of Contents
ToggleA backyard creek isn’t just decoration, it’s functional landscaping that manages drainage, attracts wildlife, and turns unused space into a focal point. Whether it’s a dry streambed that channels runoff or a recirculating feature with moving water, creeks add visual interest and the soothing sound of flowing water. The best part? Most creek projects are DIY-friendly with the right planning and materials. This guide walks through design considerations, material choices, and two practical approaches homeowners can tackle over a weekend or two.
Key Takeaways
- Backyard creek ideas solve drainage problems while adding visual depth, wildlife habitat, and resort-style appeal to any yard without requiring a full pond.
- Dry creek beds are the most DIY-friendly and budget-friendly option, costing $3–$8 per linear foot and requiring no electricity or ongoing pump maintenance.
- A successful backyard creek needs a minimum 2% grade and 2–4 feet width to look natural, with curved S-shaped paths that mimic real water flow patterns.
- Recirculating creek systems bring the soothing sound of moving water using small submersible pumps (200–1200 GPH) and EPDM liner, but require GFCI-protected electrical outlets and winterization in cold climates.
- Rock selection is critical—mix cobbles, boulders, and pea gravel in varied sizes to avoid a staged appearance, and pair plantings with moisture-tolerant natives like cardinal flower or blue flag iris for habitat value.
- Always call 811 before digging to mark utilities, check local codes for stormwater permits, and install reservoir covers for safety when children or pets use the yard.
Why Add a Creek to Your Backyard?
Backyard creeks solve real problems while looking good. In areas with drainage issues, a dry creek bed directs stormwater away from foundations and prevents puddling without the expense of buried drain tile. The rock and gravel create a permeable channel that slows erosion and filters runoff naturally.
From a design perspective, creeks add depth and movement to flat yards. They draw the eye through the landscape, connecting different zones like patios, garden beds, or lawn areas. When integrated with plantings, native grasses, ferns, or moisture-loving perennials, they create habitat corridors for pollinators, birds, and beneficial insects.
Moving water features with recirculating pumps bring sound into the equation. The white noise masks street traffic and neighbor activity, making outdoor spaces feel more private. Recirculating systems use a small submersible pump (typically 200-1200 GPH depending on creek length) to pull water from a hidden reservoir and push it uphill through buried tubing, creating a continuous loop.
For homeowners looking to boost curb appeal or create a backyard entertaining space, a creek adds a resort-style element without the maintenance of a full pond. It’s landscaping that works year-round, even in winter when moving water can be shut down and the dry bed still provides structure.
Planning Your Backyard Creek Design
Choosing the Right Location and Layout
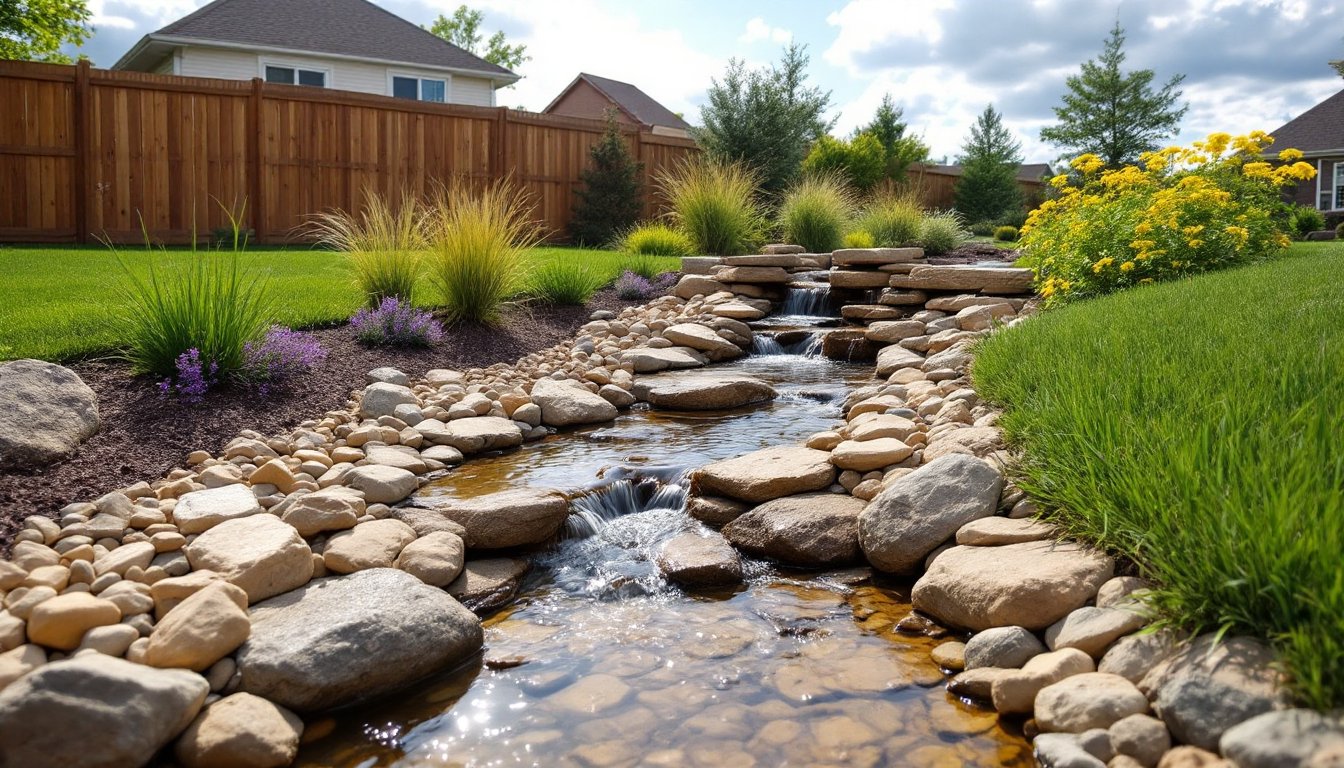
Start by walking the yard after a heavy rain. Look for existing drainage patterns, where water naturally flows, pools, or causes erosion. These are prime spots for a creek, since you’ll be working with gravity instead of fighting it. A successful creek needs a minimum 2% grade (2 feet of drop per 100 feet of length) to look natural and function properly. Steeper slopes work fine but may require larger boulders to slow water flow and prevent washout.
Avoid placing creeks directly under large trees if possible. Roots will complicate excavation, and falling leaves create constant maintenance. But, partial shade is ideal for keeping water features cool and reducing algae growth in recirculating systems.
Sketch the creek path using a garden hose or marking paint. Curves look more natural than straight lines, aim for gentle S-curves with wider outside bends where water would naturally slow and deposit sediment. Make the creek 2-4 feet wide for visual impact: narrower than that reads as a ditch, wider requires significantly more materials.
Check local codes before digging. Most residential creek projects don’t require permits, but if you’re altering stormwater flow near property lines or connecting to municipal drainage, you may need approval. Call 811 at least two business days before digging to mark underground utilities.
Selecting Materials for a Natural Look
River rock is the backbone of creek design, but mixing sizes creates realism. Use 3-5 inch cobbles for the main creek bed, 6-12 inch boulders to line the banks and create visual anchors, and 1-2 inch pea gravel or crushed stone to fill gaps. Avoid uniformly rounded rock or bright white stone, it screams “landscaping supply” instead of natural watercourse.
For dry creek beds, landscape fabric goes down first to suppress weeds. Skip the fabric if you’re building a flowing feature, as it can trap sediment and create maintenance headaches. Instead, excavate to native soil or add a 2-inch layer of coarse sand as a base.
Liner choice matters for recirculating creeks. EPDM pond liner (45-mil thickness) is durable and flexible enough to conform to curves. PVC liners are cheaper but crack in cold climates. Budget roughly $0.75-$1.50 per square foot for liner, plus underlayment to protect against punctures from roots or sharp stones.
Submersible pumps should match your creek’s length and desired flow rate. A 500 GPH pump handles creeks up to 15 feet, while 1000-1200 GPH is better for 20-30 foot runs with multiple drops or waterfalls. Look for models with adjustable flow controls, you’ll want to dial in the right flow rate based on your specific setup. Expect to pay $80-$200 for a quality pump.
Plant selection depends on whether the creek is dry or flowing. For dry beds, ornamental grasses like blue fescue or fountain grass soften the edges. Around recirculating features, go with moisture-tolerant natives, cardinal flower, blue flag iris, or swamp milkweed depending on your zone. Low-water landscaping approaches, including dry stream designs, work well in regions with limited rainfall.
DIY Backyard Creek Ideas to Inspire Your Project
Dry Creek Beds for Low-Maintenance Appeal
Dry creek beds are the simplest approach and highly effective for drainage management. They require no electricity, no pumps, and minimal upkeep once established. This makes them ideal for side yards, slopes, or areas where you need function over aesthetics but still want it to look intentional.
Installation steps:
-
Mark and excavate the creek path 6-8 inches deep and 2-4 feet wide. Slope the sides gently, a 3:1 ratio (3 horizontal to 1 vertical) prevents bank erosion.
-
Lay landscape fabric across the excavated area, extending 6 inches up each bank. Overlap seams by at least 12 inches.
-
Place large boulders first, setting them partially into the banks to look embedded. Cluster 3-5 together at bends or where you want to create visual interest.
-
Fill with river rock, starting with 3-5 inch cobbles. Work from the center outward, varying the pattern to avoid a “poured” look. Add pea gravel or smaller stones to fill voids.
-
Edge with mulch or plants to transition the creek into the surrounding landscape. Avoid edging with timbers or plastic, it looks too formal.
Dry creek beds can handle significant runoff if sized correctly. For areas with heavy stormwater flow, widen the bed to 5-6 feet and use larger rock (8-12 inches) to resist displacement. Consider adding a french drain underneath the rock layer for extreme drainage issues, this involves laying 4-inch perforated pipe along the creek bottom before adding fabric and rock.
For inspiration on budget-friendly backyard projects, dry creek beds offer high impact relative to cost, typically running $3-$8 per linear foot depending on rock selection and bed width.
Flowing Water Features With Recirculating Pumps
Recirculating creeks add the sensory experience of moving water. They’re more involved than dry beds but still manageable for DIYers comfortable with basic plumbing and electrical work. Plan for a full weekend project with a helper, liner installation and rock placement go much faster with two sets of hands.
Key components and installation:
-
Excavate the creek bed 10-12 inches deep, creating a slight basin at the lower end for the pump reservoir. This reservoir should be at least 18 inches deep and wide enough for a 30-50 gallon stock tank or preformed pond basin.
-
Install underlayment and liner, working from the reservoir upward. Smooth out wrinkles and secure edges with rocks or landscape staples. Leave 12-18 inches of excess liner at all edges, you’ll trim it later.
-
Place the submersible pump in the reservoir basin, positioning it on bricks or a flat stone to keep the intake off the bottom where debris settles. Run the outlet tubing up the creek to the highest point.
-
Create a header stone at the top where water emerges. Drill a hole through a large flat rock or stack stones to create a natural-looking outlet. The tubing should be hidden but accessible for maintenance.
-
Line the creek with stones, starting with larger boulders to define the banks and direct flow. Fill the bed with 2-4 inch river rock, arranging it to create small drops and riffles. Waterfalls should drop 4-8 inches for good sound without excessive splash.
-
Fill the system and test before finalizing rock placement. Adjust flow rate and reposition stones to eliminate dead spots or excessive turbulence. Top off the reservoir to account for evaporation, expect to add 1-2 gallons per week in summer.
Electrical requirements: Most submersible pumps run on standard 120V household current. Install a GFCI-protected outlet within reach of the pump cord, ideally inside a weatherproof in-use cover. If running new wiring from the house, use UF-B (underground feeder) cable buried at least 12 inches deep, and consider hiring a licensed electrician if you’re not familiar with outdoor wiring, this is safety-critical work.
Winter shutdown: In cold climates (USDA zones 6 and below), shut down recirculating features before the first hard freeze. Remove and store the pump indoors, and drain as much water as possible from the creek bed and tubing. Flowing water can stay operational with a de-icer in the reservoir, but this drives up electricity costs and requires weekly monitoring.
For design inspiration and plant pairings, resources like The Spruce and Hunker offer galleries of completed creek projects across different yard sizes and climates.
Both dry and flowing creek designs pair well with other backyard features. Homeowners planning a hot tub installation can route the creek nearby to unify the landscape and provide natural screening. The same approach works for connecting lawn areas to more formal entertaining zones.
Safety note: Moving water and electricity require respect. Always use GFCI protection, keep pump cords out of foot traffic, and install covers on the reservoir to prevent child or pet access. If the creek is steep or located where children play, avoid deep pools and ensure rocks are stable, shifting boulders are a crush hazard.