Table of Contents
ToggleBackyard stairs aren’t just a way to get from one level to another, they’re architectural anchors that define traffic flow, frame garden beds, and add dimension to flat terrain. Whether connecting a deck to ground level or carving a path through a hillside, well-designed stairs transform an awkward slope into a purposeful feature. The right design balances safety, material durability, and visual appeal without blowing the budget. This guide walks through fifteen proven approaches, from classic stone to modern composite, with honest talk about tools, materials, and where to call in help.
Key Takeaways
- Well-designed backyard stairs ideas balance safety, material durability, and visual appeal while controlling water runoff, preventing erosion, and creating functional micro-zones in your yard.
- Building code compliance is essential—stairs exceeding three risers require handrails, riser height must stay consistent within 3/8 inch, and tread depth should be 10 to 11 inches minimum for safe foot placement.
- Natural stone stairs offer timeless elegance at $30–$80 per square foot, while budget-friendly concrete and timber-and-gravel solutions cost $5–$15 per square foot for DIY-friendly installations.
- Low-voltage LED step lighting improves safety after dark by mounting riser lights 2–3 inches above each tread and using warm white (2700K–3000K) color temperature for natural appearance.
- Landscape plantings with ground covers, borders, and erosion-control measures soften stair edges while preventing heave and keeping treads clear for safe passage.
- Proper base preparation, drainage management, and material selection determine whether backyard stairs last 5 years or 50 years in your outdoor space.
Why Backyard Stairs Matter More Than You Think
Stairs do more than prevent sprained ankles on steep lawns. They control water runoff, prevent erosion, and create micro-zones for plantings. A four-foot grade change without stairs becomes a mud chute after rain: with stairs, it’s a garden opportunity.
Code and Safety Considerations: Most jurisdictions require handrails when stairs exceed three risers (check local IRC amendments). Riser height must stay consistent within 3/8 inch across a flight, uneven risers cause trips. Tread depth typically runs 10 to 11 inches minimum for comfortable foot placement. Outdoor stairs need slip-resistant surfaces and proper drainage to prevent ice buildup.
Structural stairs, those attached to a deck or house, usually require permits and inspections. Freestanding landscape stairs often don’t, but regulations vary. When in doubt, call the building department before mixing concrete.
Beyond compliance, stairs affect how people use a yard. Wide, shallow steps invite lingering: steep, narrow runs feel purely functional. Landings every 12 to 14 risers give climbers a breather and create natural stopping points for container gardens or lighting.
Natural Stone Stairs for Timeless Elegance
Flagstone, bluestone, and limestone deliver the permanence and texture that manufactured materials can’t replicate. Each slab carries unique color variation and natural cleft surfaces that resist slipping better than polished finishes.
Material Selection: Bluestone offers a consistent blue-gray tone and works well in formal settings. Flagstone (typically sandstone) varies from tan to rust and suits cottage or rustic designs. Limestone weathers to a soft patina but may etch in acidic climates. Buy 2-inch-thick slabs minimum for stair treads to prevent cracking under foot traffic.
Installation Method: Stone stairs work as mortared units on a concrete base or dry-stacked with gravel fill. Mortared installations require a 4-inch concrete footing below frost line and masonry skills. Dry-stacked stairs suit gentle slopes and use crushed stone base (6 to 8 inches) compacted with a plate tamper.
Set each stone with a slight forward pitch (1/8 inch per foot) to shed water. Use a 4-foot level and rubber mallet for adjustments. Backfill behind risers with gravel to prevent frost heave. For designs inspired by repurposed materials and creative construction, experienced builders often reference projects on Instructables for unconventional approaches.
Limitations: Stone stairs cost $30 to $80 per square foot installed, depending on material and labor. Mortared installations require a concrete mixer or delivery truck access. Dry-stacked stairs settle over time and need occasional re-leveling.
Modern Wooden Deck Stairs That Blend Form and Function
Wood stairs attached to decks demand precision, these are structural elements subject to building codes, not landscape accents. Pressure-treated lumber, cedar, or composite decking each bring different strengths.
Structural Requirements: Stairs need stringers (the angled supports) cut from 2×12 lumber for runs over 36 inches wide. Stringers attach to the deck with joist hangers or through-bolted ledger boards, never face-nailed. Treads use 2×6 or 5/4×6 decking with 1/4-inch gaps for drainage. Risers are optional but help keep critters out from under the stairs.
Building Process: Calculate total rise (deck height to ground) and divide by 7 inches to find the number of risers. Adjust until each riser falls between 7 and 7.75 inches. Cut stringers using a framing square, marking each tread and riser. A circular saw handles most cuts: finish the bottom corners with a handsaw to avoid overcutting.
Attach stringers with galvanized joist hangers rated for stair use. Add a center stringer for stairs wider than 36 inches. Secure treads with 3-inch deck screws (two per stringer). For those exploring broader inexpensive hardscape options, composite materials can extend the stair design language into adjacent pathways.
Maintenance Reality: Pressure-treated wood lasts 15 to 20 years with annual sealing. Cedar weathers to gray without finish but needs semi-transparent stain to prevent checking. Composite treads don’t splinter or rot but cost twice as much as wood and expand in heat, leave 1/8-inch gaps between boards.
Budget-Friendly Concrete and Gravel Stair Solutions
Poured concrete and gravel-filled timber frames deliver durability without the stone price tag. Both suit DIYers willing to handle heavy materials.
Poured Concrete Stairs: Build plywood forms using 3/4-inch sheathing braced with 2×4 stakes. Each riser needs a separate form section, think stacked boxes. Reinforce with #4 rebar placed 2 inches from the bottom and sides. Mix one 80-pound bag of concrete per 0.6 cubic feet (a standard 7-inch riser, 11-inch tread, 36-inch width takes about 12 bags).
Pour from the bottom up, tamping each riser to eliminate voids. Use a wood float for a slip-resistant texture. Cure under plastic sheeting for seven days. Strip forms after 48 hours. Concrete stairs require a gravel base (4 to 6 inches) and footing below frost line.
Timber and Gravel Stairs: Use 6×6 landscape timbers or railroad ties as risers. Excavate each step, compact the base, and pin timbers with 24-inch rebar stakes. Fill treads with 3/4-inch crushed gravel raked level. Edge each tread with smaller timbers to contain gravel.
This method suits slopes under 20 degrees and informal settings. Gravel treads drain instantly but need replenishing every few years as material compacts. Timber risers last 10 to 15 years before rotting.
Cost Breakdown: Concrete stairs run $8 to $15 per square foot in materials. Timber-and-gravel steps cost $5 to $10 per square foot. Both require wheelbarrow access and strong backs, concrete is heavy, and timbers are awkward.
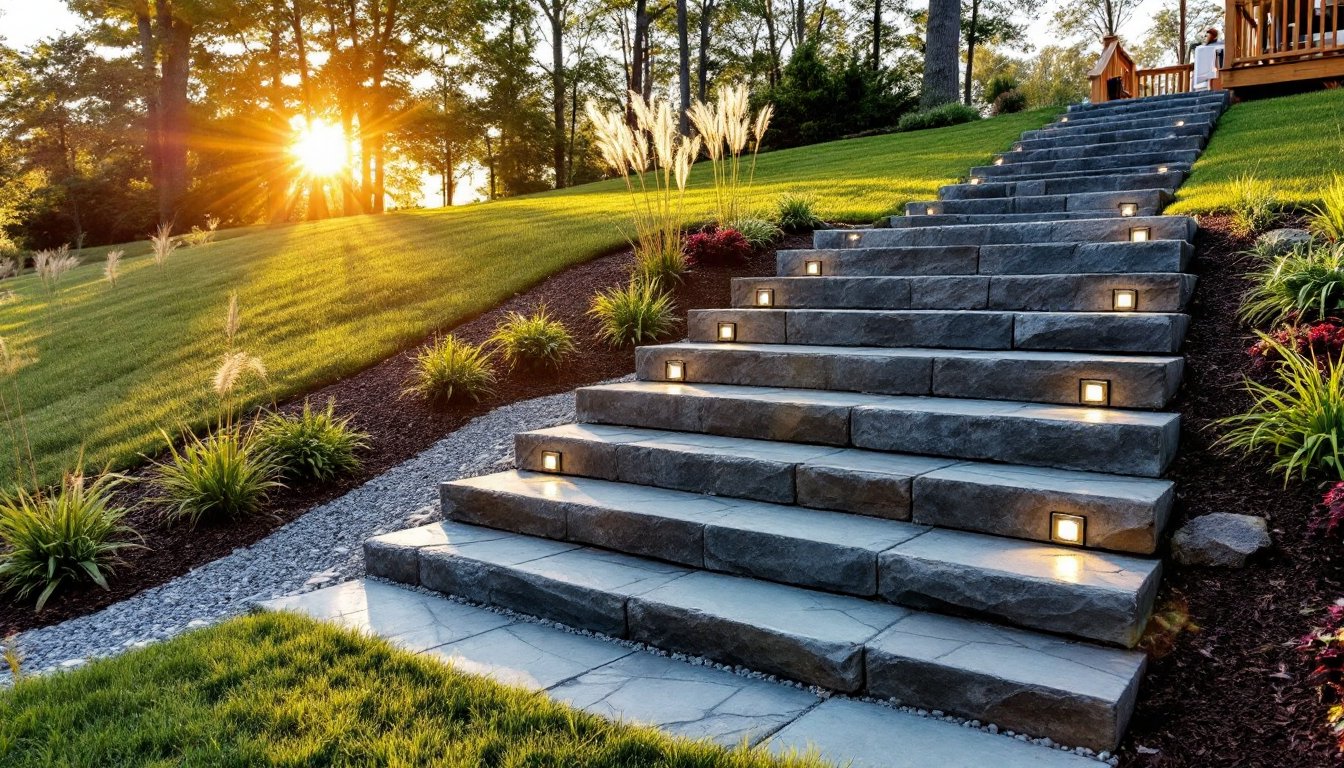
Creative Lighting Ideas to Make Your Stairs Safer and More Inviting
Stair lighting isn’t optional, it’s a safety requirement after dark. The National Electrical Code doesn’t mandate outdoor stair lights, but liability and common sense do.
Low-Voltage LED Systems: Install 12-volt LED step lights recessed into risers or mounted on posts. These draw minimal power, stay cool, and last 25,000 hours. Run 12/2 low-voltage cable from a transformer (typically 60 to 200 watts) located near an outdoor outlet. Bury cable 6 inches deep along the stair path.
Mount riser lights 2 to 3 inches above each tread to illuminate the walking surface without glare. Use warm white (2700K to 3000K) for a natural look. Many DIYers working on integrated backyard entertaining spaces extend the same lighting system from patios to stairs for consistent ambiance.
Solar and Battery Options: Solar step lights require no wiring but depend on sun exposure, they’ll disappoint under tree cover. Battery-powered motion lights work for secondary stairs but need twice-yearly battery swaps. Neither matches the reliability of wired systems.
Installation Tips: Use a 1-inch spade bit to drill through wood risers for light fixtures. Seal around fixtures with silicone caulk to prevent water intrusion. For concrete or stone, surface-mount lights with masonry anchors rather than attempting to recess them.
Add a photocell or timer to the transformer so lights activate automatically. Space lights every other step on long runs to save fixtures without sacrificing safety. Homeowners researching complementary outdoor design ideas often find detailed step-by-step construction guides on Ana White for coordinating furniture and built-ins.
Landscaping Around Your Stairs: Plants, Borders, and Finishing Touches
Plantings soften hard edges and prevent erosion along stair runs. Choose low-maintenance, non-invasive species that won’t heave pavers or drop slippery leaves.
Bordering Strategies: Install steel or aluminum edging along stair sides to define planting beds and contain mulch. Dig a trench 4 inches deep, set edging with stakes, and backfill. Avoid plastic edging, it warps and separates within two seasons.
Plant ground covers (creeping thyme, sedum, ajuga) within 6 inches of stair edges for greenery that tolerates foot traffic. Leave 12 inches clear on each side of the tread for safe passage. For vertical accents, use ornamental grasses or small shrubs (boxwood, dwarf spirea) set back 18 to 24 inches.
Mulch and Erosion Control: Spread 2 to 3 inches of shredded hardwood mulch in beds to suppress weeds and retain moisture. Refresh annually. On slopes steeper than 15 degrees, add erosion-control fabric under mulch and secure with landscape staples.
For integrated planting schemes that extend beyond the stairway, many homeowners explore creative planter arrangements that echo materials used in the stair construction. Detailed cultivation advice and seasonal maintenance tips appear regularly on The Spruce for year-round garden planning.
Drainage Considerations: Direct downspouts and surface water away from stairs with French drains or swales. Standing water undermines bases and creates ice hazards. Install gravel-filled trenches along the uphill side of stairs to intercept runoff before it crosses treads.
Conclusion
Backyard stairs solve practical problems, grade changes, erosion, access, while adding structure and flow to outdoor spaces. The best designs match material durability to climate, balance budget against longevity, and prioritize safe footing over pure aesthetics. Whether laying flagstone, cutting stringers, or pouring forms, attention to base prep and drainage determines whether stairs last five years or fifty.